Previously, the number of custom fields for customers, appointments, tasks and reports was limited to 100. This limit has now been extended to 250.
Category Archives: Anywhere
IP-based access restrictions
This news affects administrators of company accounts with at least two users.
Would you like to allow access to your portatour® only from certain IP addresses – e.g. to allow only managed company devices that are logged into your LAN or VPN? Then proceed as follows:
- Switch to the company workspace.
- Open the options.
- In the “Security” section, click on “IP-based access restrictions”.
- For those user authorization levels where you want to restrict access, set the selection box to “Restricted”.
- In the input field below, enter the IP addresses or IP ranges from which access should be permitted. Multiple entries must be separated by a line break.
- Click “Save”. The access restriction takes effect immediately.

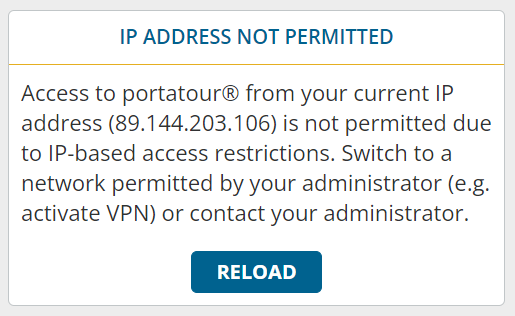
Users who are successfully logged in but are accessing it from an unauthorized IP address will receive the following error message:
Notes:
- Handle these restrictions carefully. There is a high risk of inadvertently locking yourself or other users in your company out.
- Ideally, you should store several IP addresses, e.g. redundant IP addresses for your office, so that you can continue to access portatour® in case of an emergency. Make sure that these IP addresses are static.
- If you make changes to your company’s network configuration, remember to remove the restrictions or add additional IP addresses in time.
- Only IPv4 addresses are supported – no IPv6 addresses.
Merging two customer records
It’s a common problem: you have exactly the same customer listed twice in portatour® Anywhere.
This often happens if you originally added the customer to portatour® manually as they were initially only a prospect. The customer’s details were then carried over to your company’s ERP system and automatically imported to portatour®. So you end up with duplicates in portatour®.
Our new “Merge customer” feature eliminates these duplicates while ensuring you don’t lose any data. Here’s how to use it:
- Open the Details view of a customer whose records you want to merge.
- Below the details, click “Actions”, “Merge customer”.
- Now find the second customer record – the one you want to merge the first one with.
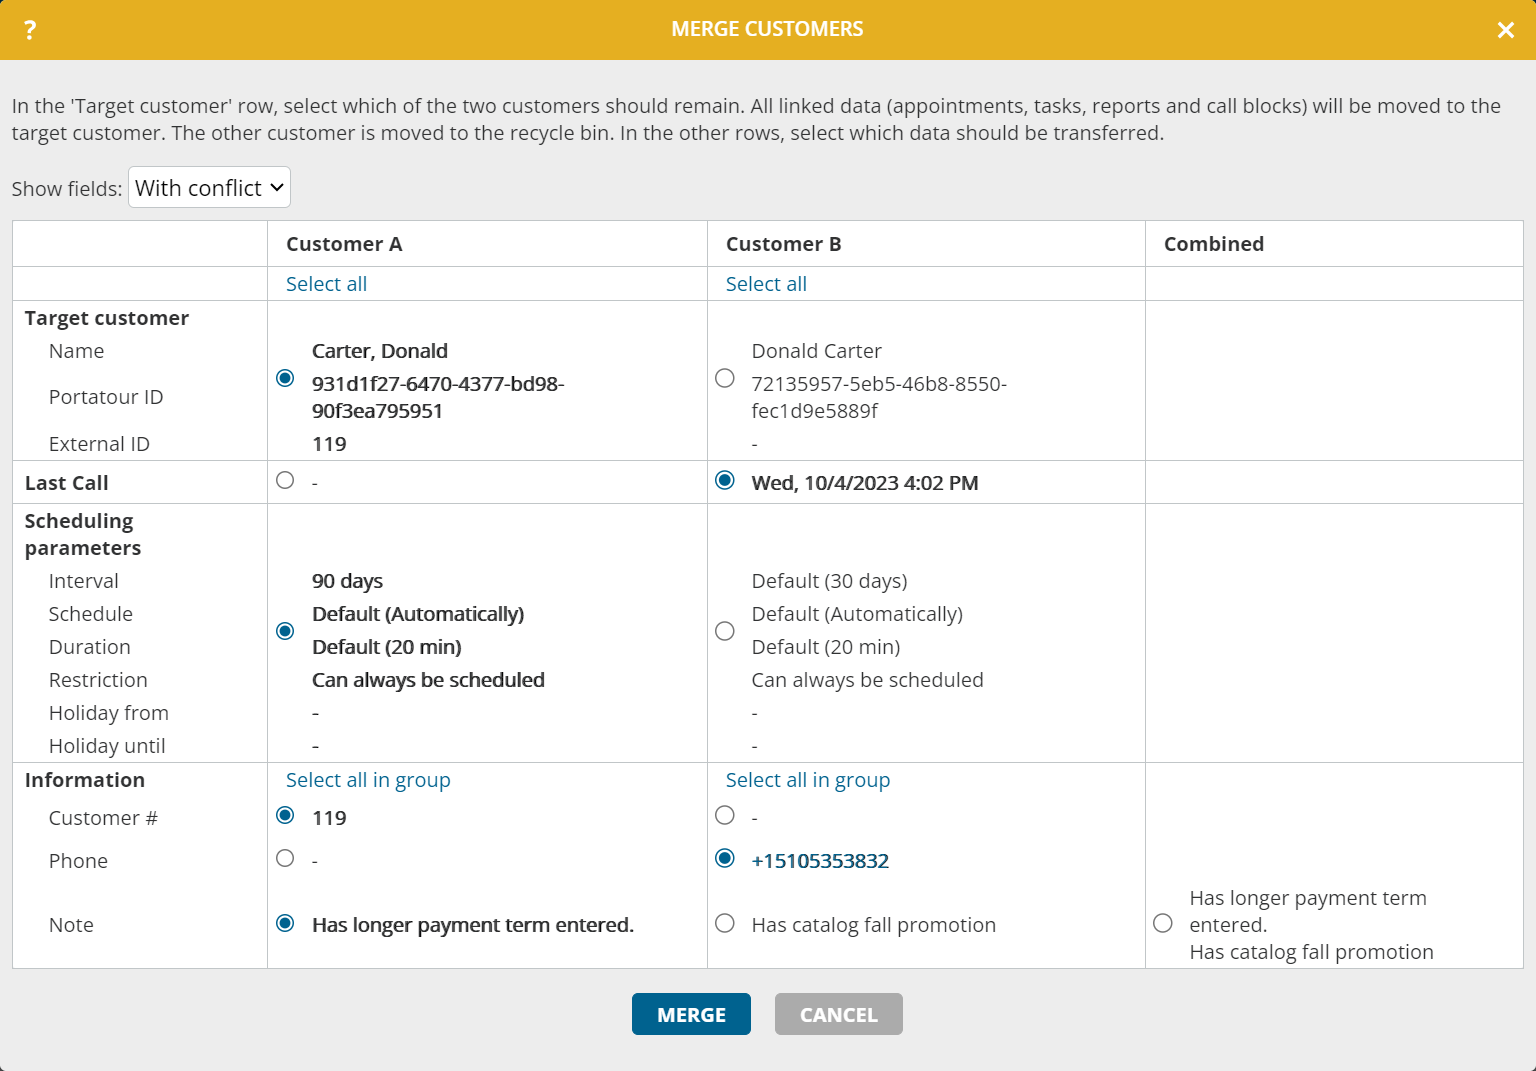
- A new window opens, showing you a comparison of the data for both customers.
- In the “Target customer” row, select which of the two data records you want to keep.
- In the other rows, select which data you want to transfer across. You can also combine text fields by selecting the “Combined” column on the right.
- Click “Merge”
- The selected data and all the data records linked to it (appointments, tasks, reports and call blocks) will be transferred to the target customer. The other customer will be sent to the recycle bin.
Voilà! The duplicate is gone.
Note:
- Limited permissions:
- This feature is basically only available if you have user permissions for “Customer > Delete” and “Reports > Edit history”.
- Limited permissions may disable the selections you can make in some fields that you want to transfer customer data from. In such cases, the target customer’s data is used.
- If only one of the two records has an external ID, select this as the target customer. This is also the default setting. The external ID indicates a (regular) data import.
- By default, the table only displays the fields in which the data of the two customers differ. For these fields, portatour® tries to find a preselection that makes sense. If necessary, adjust the selection. To see fields with identical data as well, switch from “With conflict” to “All” in the dropdown box at the top.
- If you want to merge three or more customer records, simply repeat the above steps several times.
- This feature is not available if portatour® is linked to a data source system (e.g. Salesforce, Dynamics CRM or Veeva CRM).
Major May 2023 Update
After an intensive development period, we have rolled out a major update of portatour® today. To read details about the new features, scroll down or use the following links:
We wish you much success with using the new features and are looking forward to your feedback at feedback@portatour.com.
Dynamic fields in call report
This news concerns company accounts of at least two users.
Have you ever wished that different fields would be queried when entering call reports for different customers? For example, the customer’s industry, the ABC classification, or the geographical region could play a role in what data should be collected during the call.
With portatour®, this is now possible.
As an administrator, do the following when setting up a new dynamic field group:
- At the customer list, create a filter using the extended search. The filter should include those customers for whom specific fields should be displayed when entering reports.
- Review the list to ensure that the right customers are in the list.
- Save the search organization-wide.
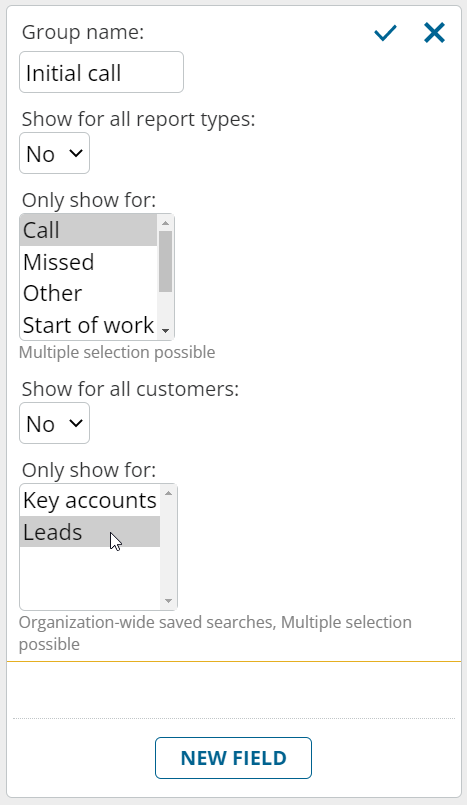
- In the organization options, open the management of custom fields for reports.
- Create a new field group.
- Set “Show for all customers” to “No”.
- For “Only show for”, select the previously created saved search.
- Create the fields within this field group.
- Save.
The change is immediately active for all users: If a customer matches the filter of the saved search at the time the report is entered, the dynamic field group is displayed. Otherwise, it is not visible.
Notes on dynamic field groups:
- If fields from dynamic field groups are filled in in a report, these entries are retained in the report in any case, even if the customer no longer matches the corresponding filter later on.
- Dynamic fields also work in offline mode. The detection of whether a customer matches the filter is based on the downloaded customer data on the device.
- When configuring the field group, several saved searches can be selected at the same time. The dynamic field group is displayed if the customer is at least part of one of the selected searches.
- Saved searches that are used for field groups cannot be deleted or renamed. Therefore, choose the name carefully. However, it is possible to change the filter criteria of the saved search at any time by overwriting them.
- If you create mandatory fields in dynamic field groups, users only need to fill these fields if the dynamic field group is actually displayed.
- Dynamic field groups are always displayed in reports without customer reference.
Call interval can be changed directly in call report
Do you often change the call interval after a customer call to reschedule the days until the next call? Then you will benefit from the following innovation.
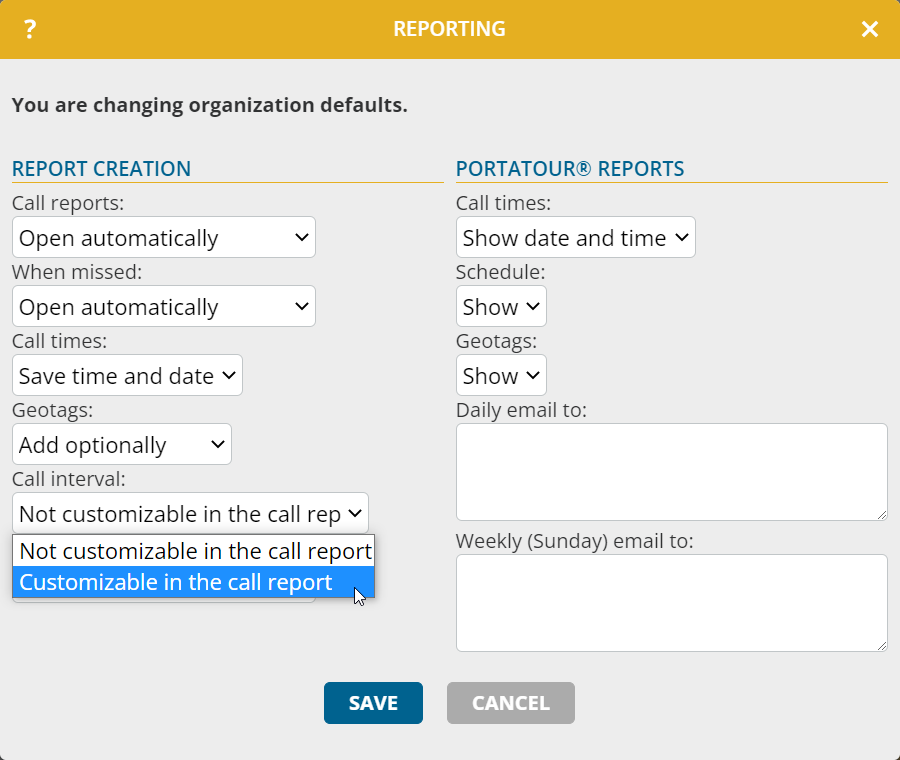
In the Options under Reporting, set “Call interval” to “Customizable in the call report”.
When entering new call reports, you can then edit the customer’s call interval in the “Next call” section.
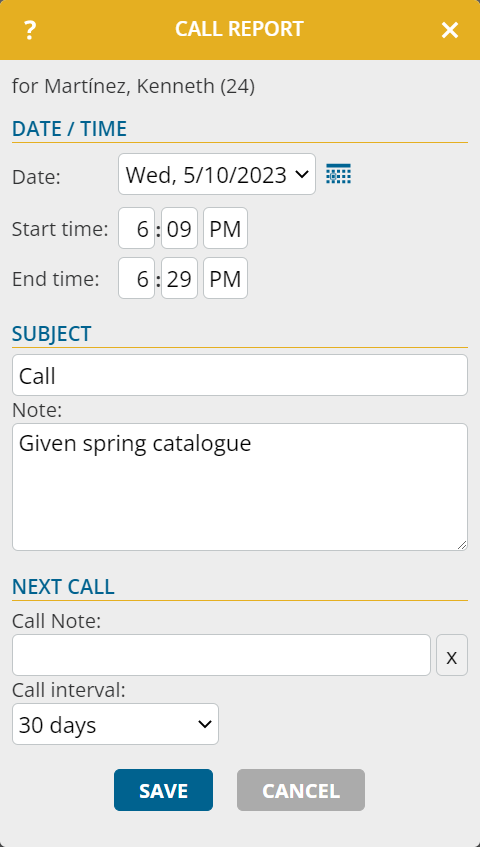
Note that the change to the call interval is permanently stored in the customer’s scheduling parameters until you change the interval again – for example, on the next call. The change in the call report is thus equivalent to editing the customer’s scheduling parameters parameters.
Bear in mind:
- For company accounts, this function may be restricted by the administrator. This is the case when users do not have the permission to change customers’ scheduling parameters or do not have the permission to change reporting settings.
- As an administrator, you can customize the organization default for above reporting settings in the organization-wide options.
- The call interval can be changed only in reports that update the customer’s last call date when they are created – i.e. “Call” and “By phone instead of in person”.
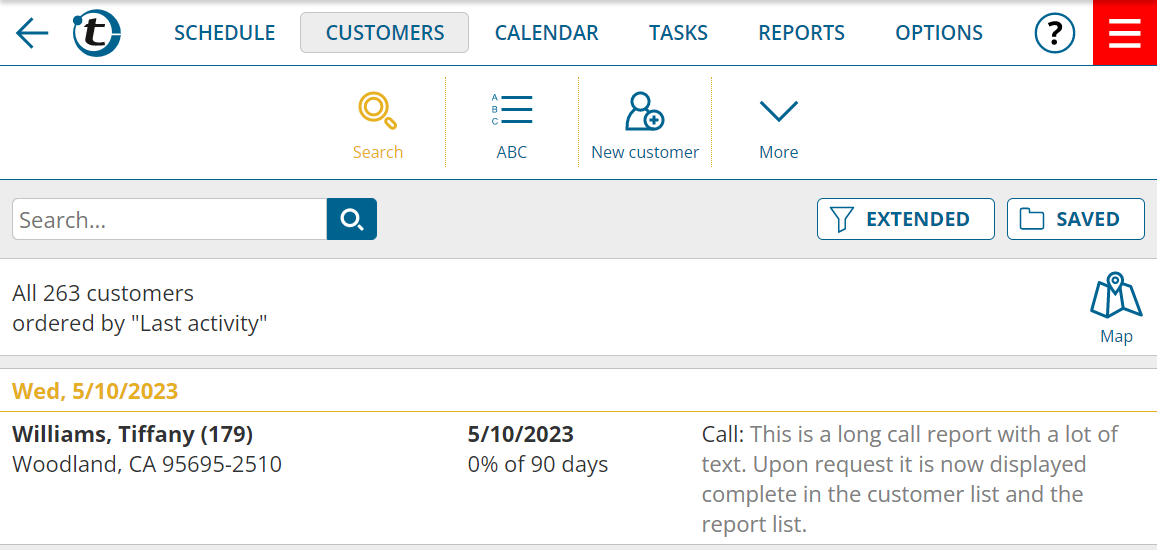
View full report text in report list and customer list
If you view the report list or customer list on a device with a larger screen (such as a tablet or PC), you will see the report text in the right column — but no more than two lines up.
If you would like to see the complete report text, then go to the Options. In the Program settings, switch “Customer list” or “Report list” to “Entire report” or “Entire report (compact)”.
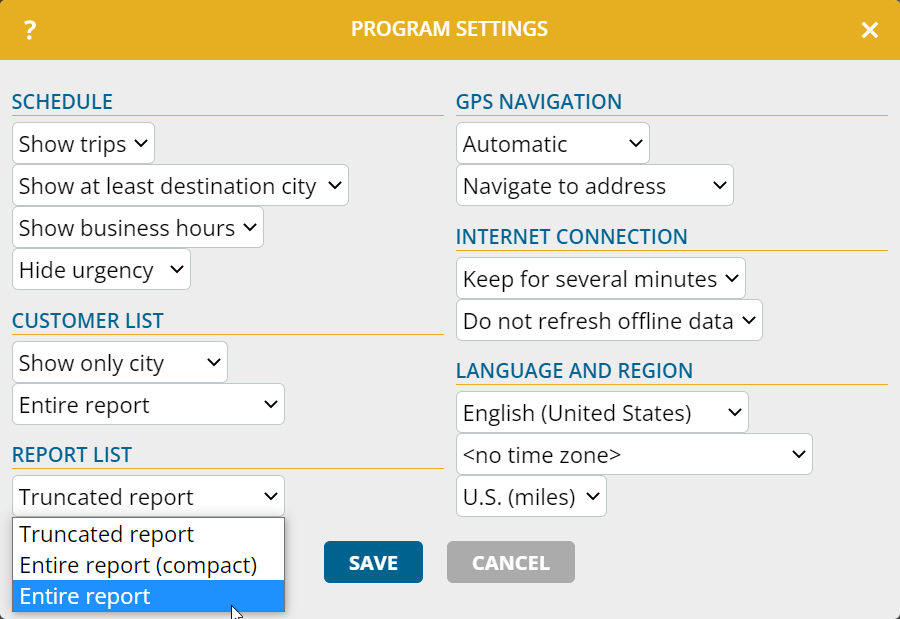
Notes:
- In compact display, line breaks are removed.
- Users can change this program setting individually for themselves.
Major November 2022 Update
After an intensive development period, we have rolled out a major update of portatour® today. To read details about the new features, scroll down or use the following links:
- Opening schedule trips in the map
- Managing saved searches
- Global reports list and search
- Selection mode and mass deletion of reports
We wish you much success with using the new features and are looking forward to your feedback at feedback@portatour.com.
Opening schedule trips in the map
Trips in the schedule are now clickable.

Clicking on them will take you to the map view of the relevant schedule day, where the corresponding trip is highlighted.
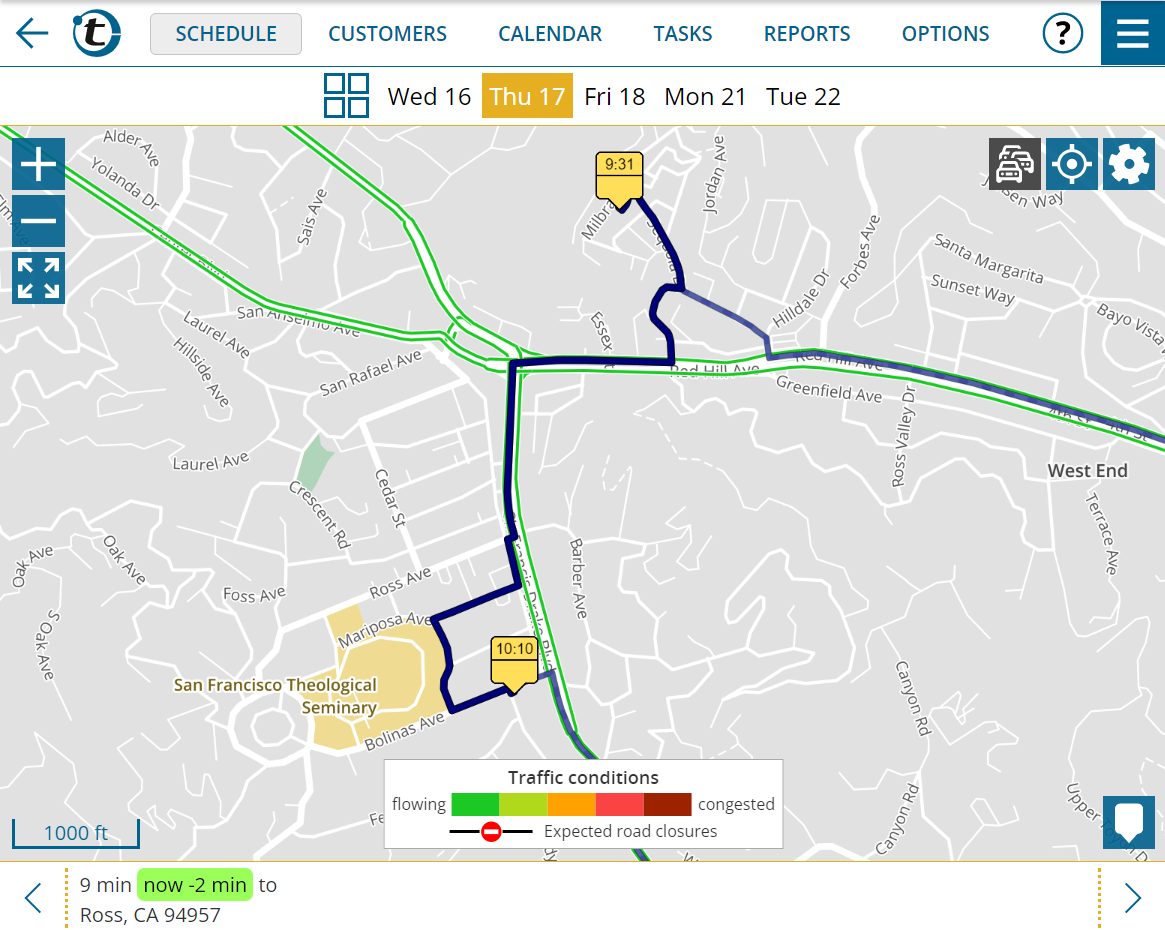
Tip: To factor the current traffic situation into the proposed trip, click the “Current traffic” button in the upper right corner.
Managing saved searches
Previously, saved searches could be created and deleted. As of this update, there are extensive possibilities for managing searches.
To overwrite an existing saved search, first run the new search (e.g. using extended search), then go to the menu of saved searches and click the Save icon to the right of the search you wish to overwrite.
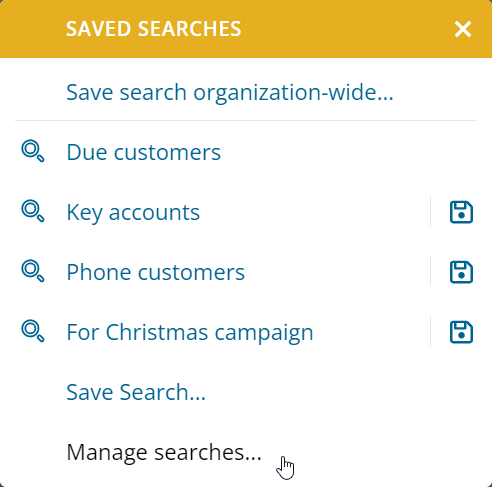
Clicking on Manage Searches opens the following window:
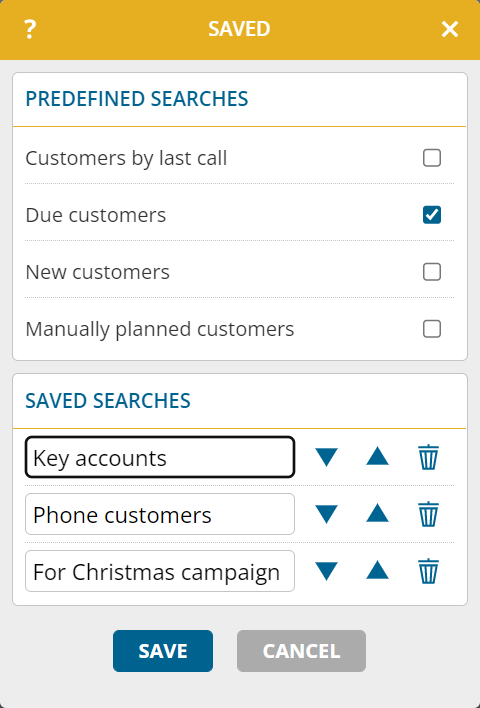
The customization options are as follows:
- To show/hide predefined searches, use the check boxes.
- To rename saved searches, change their names in the input field.
- To change the order of saved searches, use the up/down arrows.
- To delete a saved search, use the recycle bin icon.
As an administrator, you also have the same options for company-wide saved searches. To do this, click on “Manage searches company-wide.”